Prime Operator
위성 컨트롤 기계군단의 창시자
헤니르 교단과의 교전 이후, 지금의 기계들 만으로는 부족하다고 판단한 로제. 엘리시온과 엘리아노드에서 마주한 나소드들은 로제에게 큰 영감을 주었고, 연구 끝에 위성 시스템을 이용해 대규모의 기계군단을 언제 어디서든 진두지휘 할 수 있는 새로운 힘을 손에 넣게 된다.


Skills
Force Passives
Skill Details
Skill Details
Skill Details
Skill Details
Skill Details
Skill Details
Skill Details
Skill Details
Skill Details
Skill Details
Skill Details
Force Abilities
Skill Details
Skill Details
Skill Details
Skill Details
Skill Details
Skill Details
Skill Details
Skill Details
Skill Details
Skill Details
Skill Details
Skill Details
Skill Details
Skill Details
Skill Details
Mod Skills
Skill Details
Skill Details
Skill Details
Skill Details
Skill Details
Skill Details
Skill Details
Skill Details
Skill Details

Prime Operator Guide
by Riza
Last update: Feb 20, 2026, 7:27 AM
Overview
Prime Operator (PO) is a Magical Synergy DPS who excels at dealing high burst and sustained damage against both small and large bosses. Her kit combines strong summons, fast-cast skills, and a solid team synergy such as Cooldown Acceleration (CDA), giving her a valuable spot in many end-game raid compositions.
While her base rotation is simple and effective with minimal investment, her true potential requires deeper optimization involving Exascale management, advanced rotations, and summon timing.
Pros
- Very high DPS output on any boss size
- Excellent team synergy: offensive and defensive utility via CDA and Damage Reduction
- Low skill floor; strong damage even without optimal rotation execution
- Fits into most teams due to valuable CDA support
Cons
- High skill ceiling due to strict optimization requirements
- Requires precise window planning and gear swaps for maximum DPS
- Chip-damage optimization (summons / abusing fast-cast skills) is mandatory for peak results
- Weak and/or slow dungeon clearing compared to other DPS classes
- Heavily reliant on CDA to maintain a smooth rotation
- Slow opener; Deaths or buff loss severely impact tempo
Skill Bars
Prime Operator has multiple viable loadouts depending on CDA availability and player comfort level.
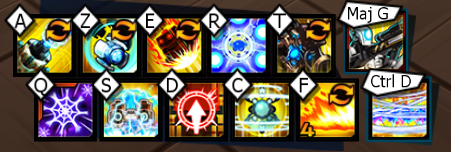
Skill Bar A (Standard)
 Skill Bar B (Low CDA party composition)
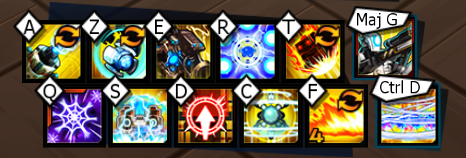 Skill Bar C (Beginner-friendly)
 Alternate skill bar


Tip: Fog of Death is only needed for Awakening Title timer, feel free to swap its position with Gale Force in the alternate skill bar.
Gear Choice
Both Red Exascale and Blue Exascale are viable endgame options for Prime Operator.
Red is generally preferred (whether you play Continuous Damage or Reset comes down to personal preference) due to its interaction with your Hyper Active - this will be covered later in the guide.
That being said, Blue Exascale tends to perform better in solo content, where the lack of external cooldown support makes its consistency more reliable..
Rotation – Clearing
PO’s clearing relies on fast-cycling and short-range skills, as she lacks true full-screen map coverage.
Best clearing skills:
[Mod] G-2 Rolling Thunder and [Mod] Barbecue: Wholly Grilled are fast, wide, and multi-hit skills.
[Mod] M-3 Flamethrower: Radial Flame - hits vertically above/below platforms
Additional tools:
[Enhanced] Mecha Drop:
- Good for low-level or weaker mobs.
- Weak in higher-end content; stick to [Mod] Mecha Drop’s short burst range instead.
General Clearing Tips
- Spam fast-cast skills constantly while moving
- Abuse Night Parade of the White-Ghost or The Setting Sun titles for more casts on the best skill
Rotation – DPS
Prime Operator’s rotation is simple to execute, but scales heavily with CDA optimization and proper summon timing.
Dungeon opening
This is your rotation at the start of every raid:
Limit Over → Magnetic Guard → [Mod] G-1 Corona (install only) → Awakening (then switch to your DPS title) → Air Mecha: Gale Force → [Mod] G-0 Battleroid (with T Slot buff) → [Mod] G-1 Corona (full cast) → Auto-gun X command (Stigma application)
This ensures you start with your full buffs + debuffs applied.
Main Rotation (Standard / Balanced CDA)
Maintain a slight distance (around one >>Z dash length).
[Mod] M-3 Flamethrower: Radial Flame
[Mod] G-2 Rolling Thunder
[Mod] Mecha Drop
Magnetic Generator
After casting Magnetic Generator, back off to your original spacing and repeat.
Tip: When spaced properly, start holding your forward arrow key the moment you cast M-3 Flamethrower: Radial Flame so you slowly drift toward the boss while cycling skills. This helps you naturally land in the perfect range for Magnetic Generator without overcommitting.
Key notes
[Mod] M-3 Flamethrower: Radial Flame is your highest-priority skill for DPS in most cases and the main target of Night Parade of the White-Ghost title resets.
Use Magnetic Generator only if animation downtime won’t harm rotation duration; requires a gap closing in case of a small boss
Armored Tempest is not part of the standard rotation due to its long cast time. Only use it when necessary (e.g. Yellow Choir line in Orchestra Hall or when Super Armor is required). Even then, its value is inconsistent - feel free to replace it with Barbecue: Wholly Grilled, which is also better for clearing.
Keep your personal buffs separated on the buff bar for visibility. Refresh Magnetic Guard and Limit Over before they expire. Magnetic Guard also builds Red Exascale stacks quickly, so do not hesitate to press it whenever it’s available.
It is recommended to save the T-Slot buff for [Mod] G-0 Battleroid, since summons keep the damage increase for their entire duration.
Just make sure they actually linger for a while - if it’s a short burst window or the boss is close to starting a pattern, use the T-Slot on M-3 Flamethrower: Radial Flame instead.
Resummon Gale Force and Battleroid whenever they die or when a new T-Slot buff is available to maximize their efficiency.
Your robots appear in your buff bar so it is easier to track their status.[Mod] G-2 Rolling Thunder and Mecha Drop have a a lightning fast cast time - use them as soon as they come off cooldown, even before M-3 Flamethrower: Radial Flame.
In low CDA teams, use the regular G-0 Battleroid and recast Gale Force whenever it’s off cooldown. The initial missile bursts actually add up. PO gets a surprising amount of extra damage from her constant spam of quick multi-hit filler skills and summons; every little bit helps.
The Setting Sun title is mandatory on PO!!!
Green Exascale optimisation
For Green Exascale, avoid rapidly spamming Flamethrower. Skills only begin cooldown recovery after they are cast, so rotating fast-cast skills keeps cooldowns flowing and contributes valuable chip damage. The following loop is optimal:
- [Mod] M-3 Flamethrower: Radial Flame
- [Mod] G-2 Rolling Thunder
- [Mod] M-3 Flamethrower: Radial Flame
- [Mod] Mecha Drop
- [Mod] M-3 Flamethrower: Radial Flame ×2
- [Mod] G-2 Rolling Thunder
- [Mod] M-3 Flamethrower: Radial Flame
Since G-2 Rolling Thunder and Mecha Drop are essentially one-frame casts, this pattern maximizes continuous uptime, cooldown cycling, and chip damage accumulation for better overall damage.
Hyper Active Optimization (Why Red Exascale Is Superior)
The real reason Red Exascale is superior on PO is that your Hyper Active fully retains the 500% Hyper Active Damage increase from Red Exascale for its entire summon duration. This allows it to become a top-tier DPS source, especially on small bosses.
To push Hyper Active Damage even further, consider:

A second pair of Exascale Gloves with full Hyper Active Damage (+0 R0 is completely fine).
A second set of Artifact Armor, Crown and Necklace with full Hyper Active Damage identifications.
(Largely obsolete with the new Mirror Dell Artifact upgrade system, and not a major loss overall - feel free to run a full Hyper Active Damage on your main armor instead if you’re comfortable giving up some damage reduction).God of Dimensions title and Cogwheel Gem Eye Patch accessory if you are comfortable managing swap pages
(Can be awkward to use mid-raid, but it’s the strongest option if you can manage it).
The Hyper Active should only be activated in certain situations:
- Long damage windows where it can be fully utilized.
- During pattern downtime or transitions before guaranteed longer damage windows (try to rebuild as many Logic stacks as possible before re-engaging).
- Only use Hyper Active if it can stay active and deal damage for most of its duration.
If the summon cannot remain on the field and actively DPS, it is not worth using - avoid this entirely in fast raids or short DPS windows.
Because Hyper Active resets your Red Exascale stacks, using it at the wrong moment will temporarily weaken the rest of your kit.
For consistency and uptime, Antenna Earrings are recommended.
Best Allies
Anything that provides CDA works extremely well with PO.
Nyx Pieta is especially strong since he also provides Hyper Active CDA, which directly benefits PO’s Hyper Active.