Centurion
After constant research, Chung overcomes the physical limitations that existed previously.
Chung starts experimenting on the new portal device that he develops using the Nasod structures from Debrian Laboratory as reference until he finally succeeds in creating a new form of Destroyer by fusing it with the Disfrozen portal. His daring research and his artillery strikes that sweep the battlefield grants him the name ‘Centurion.’


Skills
Force Passives
Skill Details
Skill Details
Skill Details
Skill Details
Skill Details
Skill Details
Skill Details
Skill Details
Skill Details
Skill Details
Skill Details
Force Abilities
Skill Details
Skill Details
Skill Details
Skill Details
Skill Details
Skill Details
Skill Details
Skill Details
Skill Details
Skill Details
Skill Details
Skill Details
Skill Details
Skill Details
Skill Details
Mod Skills
Skill Details
Skill Details
Skill Details
Skill Details
Skill Details
Skill Details
Skill Details
Skill Details
Skill Details

Centurion Guide
by Cheyo
Last update: Mar 19, 2026, 9:41 PM
Overview
Centurion is a great synergy character that performs especially well on new content releases involving groups. With his team-wide Super Armor and debuffs, he's very sought-after in that regard.
His specialty is definitely large bosses. His four main skills deal very high damage to big targets. However, he can still be very effective against smaller or human-sized enemies by adjusting skill priorities.
Pros
Super armor for the whole team.
Easy dungeon clearing.
Some of the highest damage against big bosses in the game.
Synergizes well in raid content.
Fast cast times.
Cons
Burst and clear, despite being good, are rather slow due to skills mostly dealing damage over time.
Mana/Cooldown issues without good El Resonance or stats.
Refreshing fields and red cannonballs very often can be annoying.
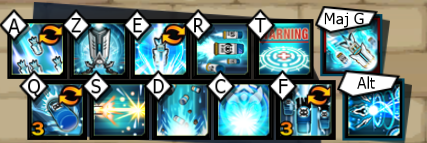
Skill Bar
Centurion's skill bar should change depending on the content you're playing. For linear dungeon clearing, you might want to use [Mod] Carpet Bombing.
When dealing with really big bosses like 21-5, it’s better to put Carpet Bombing in the transcendence slot for the cooldown resets instead of Artillery Strike.
Skill bar for Bossing.
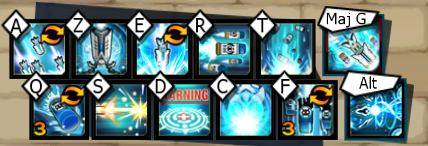
 Skill bar for very large bosses.
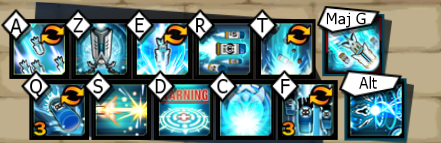
 Skill bar for dungeon clearing.
Passives
Very straightforward. Once in Berserk mode Awakening, everything is set up. You will gain cooldown acceleration, cooldown reduction, increased boss damage, and magic attack increase.
Skill Rotation
The rotation varies greatly depending on how much time you have to deal damage during a burst window or how big the boss is.
Placement-wise, except on large targets, it is best to stay as close as possible to bosses.
The four main skills are the following, to be generally used in this order:
[Mod] Aceldama
Artillery Strike - Missile Shower
Carpet Bombing
Mortar
This will vary. For example, on very large bosses, it is best to mainly focus on [Mod] Aceldama and Carpet Bombing.
For small bosses, since Artillery Strike's cast time is long, focus on it only when there’s enough time for the skill to finish. (during Green Exascale buff, it is not recommended to use it if a health threshold is about to be met). It is better to resort to [Mod] Aceldama if damage needs to be dealt quickly.
[Mod] Bombing Artillery serves as a filler skill in case of cooldown issues.
Dread Chase is an utility skill when enemies are too far, it is not a good skill to use within the rotation.
Centurion benefits greatly from cooldown reduction in groups. Since his cast times are very fast, smoothly rotating to the four main skills without fillers will deal tremendous damage.
Red Cannonballs
Centurion can use enhanced cannonballs, each dealing 5% additional damage per ammo consumed for Bravery/Strength skills, and 2% for Active/Tenacity skills.
Permanent red cannonballs can be ensured with Tactical Field, which refills them, and [Mod] Scare Chase, which gives a buff that prevents consuming cannonballs. The buff only lasts 10 seconds, it is required to refresh it frequently.
Skills that consume all cannonballs at once will get a 30% damage boost. This includes:
[Mod] Aceldama
Artillery Strike - Missile Shower
[Mod] Carpet Bombing
Regular Carpet Bombing only consumes cannonballs for its third wave, meaning only the last wave is affected by the 30% damage boost.
Dread Chase consumes 6 cannonballs, but not all at once. This means the skill only gets a 5% damage boost.
Skill-specific tips
[Mod] Aceldama - Thebez
Positioning for Aceldama is very important, but fairly simple. Upon casting, seven missiles will appear, three of them aiming at your character, which is great for small bossing as well.
For big bosses, it is best to cast it inside their hand while the rest of the skill hits forward. For example, in the first phase of Wilting Tower: Flight (21-4), when casting it inside one of the hands, 3 missiles will also land nicely on the other hand.
[Mod] Heavy Field
You can precast Heavy Field even if an opponent is not debuffable. The debuff will apply as soon as they become debuffable again.
Mortar
Mortar is one of Centurion's best skills. Since its cast is nearly instant and the hits take time to occur, it’s great to cast it as soon as possible and whenever it is available.
This is one of the reasons why Centurion consumes a lot of MP. It deals even more damage when splashing enemies or hitting very tall bosses.
The description says only three mortars can be summoned at once, but there's a trick: If you cast a fourth mortar, the first one will fire once more before disappearing. Newly summoned mortars will also instantly fire their first shot. This makes spamming Mortar a very strong option.
Dread Chase
This skill, while present in the skill bar, is quite bad. It deals very low damage and can waste your red ammo if the [Mod] Scare Chase buff runs out.
It should only be used to reach an enemy that is too far away, but it should not be used in your regular rotation.
Keep in mind it is better to use Dread Chase facing away from your target, as the missiles will split, dealing slightly more damage.
Commander's Mark
Commander's Mark is a debuff with very unusual properties. It will cast missiles when you or your teammates hit the target.
The missiles' damage is based on the hit that triggered them.
Critical Damage and Maximize stats are ignored for the base hit, but they are applied to the missiles.
Polarize and Boss Damage increase stats apply to the base hit, but not to the missiles.
If you plan on playing Centurion as a support character, you should use it. It is not worth it otherwise.
Gear choice
Red and Blue Exascale are both viable options, as the character can still struggle with cooldown at times.
With Red, playing around The Setting Sun title (13-5) and Yellow artifacts is enough for smooth gameplay, but it is harder.
Blue is perfectly fine as well — it will make Centurion easier to play.